To this point in the Guppy Challenge the focus has been on your technique from the hips down. Maybe you didn’t realize that! Our first drill was one-arm pulls, and you might think the point of this drill is the pull. No! Remember, your primary focus during this drill was your off-arm (the one not pulling). Your job was to keep that arm straight in front of you, with your hand just below the surface.
When you can do this drill, and do it right, you’ve achieved something important. You are no longer “stalling” in the water in between strokes. You’ve connected the two halves of your body (above-the-waist and below-the-waist).
Here’s another way to put it, in modern swim-speak: You’re teaching yourself “hip-driven freestyle.” You’re learning to propel yourself with your kick, with your hips, and the proof of your success is your ability to perform one-arm pulls with the off-hand on the surface, immobile, instead of sculling to keep yourself afloat with every stroke.
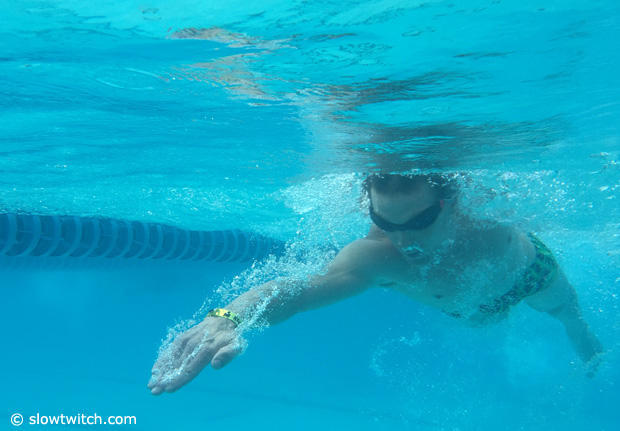
So, to recap, are you able to do this drill? With your off arm in front, near the surface of the water, immobile? If so, then pat yourself on the back. You are swimming hip-driven freestyle! I won’t say you’ve mastered it, but you’re doing it.
To this point in the Guppy Challenge I’ve tried to expose three deficiencies in your stroke (if you have these deficiencies):
1. Stalling after every stroke. This could be caused by a number of things (bending at the waist while breathing; kick and pull not coordinated). Doesn’t much matter why. What matters is that when you can perform the one-arm pulls with your off-arm straight in front of you, just below the surface, with a 6-beat kick synchronized with every pull of the arm, we’ve got most of that problem licked.
2. Feet below the surface. How do we know when we’ve licked this problem? When your feet are no longer below the surface! I don’t mean to sound glib, but when your heels clear the surface of the water without needing to overmuch bend your knees (your kick should be executed with a reasonably straight leg) then we’ve solved that problem. Just know that sinking feet are often caused by the position of your head in the water. We talked about this last week (and a video below helps describe this).
3. Body out of alignment. This is almost always a problem caused by what you do when you take a breath. If you have this problem you’ll know it because you’ll fishtail when you swim with a buoy between your thighs, and more so with your ankles banded. You can either: A) band your ankles and float your legs with a buoy; or, B) inflate a wheelbarrow tube, stick your feet through it, which does the same thing (floats your legs while banding together your ankles); C) Augment that with loosely banded ankles allowing you to kick while not letting you splay your legs wide. Keep swimming with banded ankles. When you no longer fishtail you’ve solved this problem.
Phew! Okay! That brings you current! Here’s a video I found by Australian coach Brenton Ford that I thought was (in Aussie parlance) spot on:
Here’s one thing Brenton mentioned in that video: legs sink when a swimmer pushes down instead of back. Fine. Good point. But here’s something else about that: You also go slower when you push down instead of back. If you push down you’re forcing yourself up. If you push back you’re pulling yourself forward. If you watch a good distance swimmer, you’ll note a couple of things. First, he’s got that hip-driven thing going on. After the catch (the point where his hand enters the water) his arm extends. He doesn’t start pulling right away. (Now do you see the point of the one-arm pull drill?)
Only after the hand of his recovering arm is about at ear level does his extended arm begin the pull. Let’s talk a bit about that pull.
The rage for the last decade or more has been EVF, which stands for Early Vertical Forearm. It’s also called High Elbow Catch or High Elbow Anchor. It’s how most world class swimmers swim, in particular for distances at or beyond 400 meters. What do you need to know about EVF?
First, the why, then the whether. As to the why: Some believe this technique allows you to pull more powerfully. I don’t believe this. Neither does Gary Hall, Sr., who is a 3-time Olympian and someone with whom I would never deign to disagree. Except in this case. Gary believes this technique works because it’s more hydrodynamic. It “decreases frontal drag.” Marc Evans, however, believes it’s about surface area: Swimming this way increases "the amount of water the fingers, hand, forearm and upper (inside) arms can hold.” This is what makes the most sense to me.
Now let’s talk about the whether: Should this technique even be taught to you? From what I’ve read both Swimsmooth and Gerry Rodriques (along with Gary Hall, Sr., the two adult onset coaches I admire most) do not see much value in trying to teach triathletes this technique. I half agree; I half don’t. Here’s where I split this baby: I want you to swim that way, but I don’t want you try to swim that way. Just focus on this: Think of your entire forearm (from the elbow to the fingertip) as a paddle. I’m not a canoe paddler, but it seems to me the most efficient way is to reach forward, drop that paddle vertically into the water, and pull straight back.
So, that’s your mission. Your arm, from the elbow down, is a canoe paddle. Not directly upon the catch! Your first movement after your hand enters the water is straight ahead, parallel to the surface, hand near the surface. Glide. Or extend. (Some coaches get picky about the nomenclature.) So, first, reach forward, with the hand directly in front of your shoulder. When your recovering hand is at ear level, drop that canoe paddle in the water and pull back with that paddle perpendicular to the water.
Don’t worry about making an S pattern with your hand, or any of that stuff you learned as a kid. If you pull straight back your hand will automatically make the S pattern; if you try to make an S pattern then your hand does something really terrible in the water. Still, 2 or 3 in 10 Slowtwitchers actively try to make an S pattern. If that’s you, stop doing that.
One more thing about the "canoe paddle": Every analogy breaks down somewhere. In a real canoe, that paddle is going to be facing straight down. Not so your forearm; it'll be at an angle. Don't bother about that. Just focus on this: It needs to be perpendicular to the water you're pulling. If you want to know what this looks like, perfectly executed, here's Grant Hackett.
You can't swim like Grant does, using this technique, if you can't perform the one-arm drills with your off hand immobile and near the water's surface. Look at Grant's hand and arm just before he commences his pull. Look at where his recovering arm is when he commences his pull. Just so, I don't want you to try to swim like this. For now, I just want the catch-and-extend to be done correctly, and then I want you to form that "paddle" with your forearm and hand, so that you can pull as much water as you grab. Then, just pull straight back, with your forearm perpendicular to the water.
Drills? Are there new drills that help with this? Well, first, the good ol’ one-arm pull (focus on the off arm!) is exactly for this. Second, let’s talk about a new way to kick. if you own a symmetric snorkel, how about you do your kicking with the snorkel, one arm in front of you, hand just below the water’s surface, other hand down at your side? Alternate arms every length of the pool you swim. It’s hard! Can’t do it? Maybe try this with zoomers.
That’s enough new thinking for one week. So, your focus: Keep working on your kick; on making body changes that keep you from fishtailing when you swim with banded ankles; kicking without splaying your legs when you breathe. Keep all that up, don’t forget that.
And now – this is what’s new – when you swim, your hand should extend after the catch, hand staying near the surface! When your recovering hand has reached your ear, then drop that canoe paddle in the water and pull straight back. Not down. No S pattern. Just straight back, keeping your entire forearm and hand perpendicular to the water.
Guppy Challenge, Week-5, Workout-1
Warm-up => 6 x 50yd freestyle.
Style + Kick set => 3 x 100yd, followed by 3 x 50yd kick. Then, do it all again. (This is a 900yd set). You have some freedom here. Just as when I tell you to do "stroke" that means you can do any stroke (backstroke, breaststroke, butterfly) other than freestyle, when I write "drill" I'm saying you can choose your drill. For these 3 x 100yd swims, you may choose between 1-arm pulls; or bound ankles (with or without a center snorkel); or simply swimming with a center snorkel.
Main set =>
GUPPIES => 10 x 100yd, 25 as slow as you can, 75 fast. Short rest (5sec)
TARPONS => 12 x 100yd, 25 as slow as you can, 75 fast. Short rest (5sec)
TUNAS => 15 x 100yd, 25 as slow as you can, 75 fast. Short rest (5sec)
Warm-down => 100yd, easy, alternate freestyle and “stroke”.
Total Guppy yards this workout: 2300
—
Guppy Challenge, Week-5, Workout-2
Warm-up => 2 x 50yd, 2 x 100, freestyle, easy! On a leave interval 5sec to 10sec slower than your regular leave interval.
Style set => 6 x 100yd: Bound ankles. Use a center/symmetric snorkel for the first 3 if you have one. No need to flip turn. Stop and catch your breath after every 25.
Main set => If you do this set properly, it's an 1100yd set if you're a Guppy, more if you're above Guppy:
GUPPIES => 2 times thru 5 x 100yd, reasonably hard, 5sec to 10sec rest, followed by a 50 kick.
TARPONS => 3 times thru 4 x 100yd, reasonably hard, 5sec to 10sec rest, followed by a 50 kick.
TUNAS => 3 times thru 5 x 100yd, reasonably hard, 5sec to 10sec rest, followed by a 50 kick.
Warm-down => 200yd: again, first 50 very slow, second 50 normal, then repeat. Were the “slow” 50s easier to swim, easier to maintain form, than earlier in the workout?
Total Guppy yards this workout: 2200
—
Guppy Challenge, Week-5, Workout-3
Warm-up => 6 x 50yd freestyle, easy, slow, establish a leave interval that gives you 10sec rest between each 50.
Style set => 6 x 50yd drill
Kick set => 4 x 50yd, don’t kick hard, relax, just make your way across the pool, rest 5sec or 10sec, go again.
Main set =>
GUPPIES => 1000yd, straight swim. Do this fairly hard, but don't start hard. Remember your time.
TARPONS => 1500yd, straight swim. Do this fairly hard, but don't start hard. Remember your time.
TUNAS => 2000yd, straight swim. Do this fairly hard, but don't start hard. Remember your time.
Warm-down => 200yd easy.
Total Guppy yards this workout: 2000
—
Guppy Challenge, Week-5, Workout-4 Extra Credit!
Warm-up => 6 x 50yd freestyle, easy, slow, establish a leave interval that gives you 10sec rest between each 50.
Style set => 8 x 50yd w/bound Ankles: Think about your arms: extension after the catch, directly in front of your shoulder, hand near the surface. Once your recovering hand is at eye level, make your canoe paddle, and pull as much water as you can grab.
Kick set => 4 x 50yd
Main set: Did you like last week's Fifties Party! I hope so.
GUPPIES => 30 x 50yd swim
TARPONS => 40 x 50yd swim
TUNAS => 50 x 50yd swim
Warm-down => 100yd, easy, alternate freestyle and “stroke”.
Total Guppy yards this workout: 2400
—
Guppy Challenge, Week-5, Workout-5 Double Extra Credit!
Warm-up => 5 x 100yd, first 50 1-arm pull, second 50 freestyle
Style set => 8 x 50yd w/bound ankles (with or without snorkel)
Main set =>
GUPPIES => down-ladder: 4 x 100, hard swim, short rest, kick a 50. 3 x 100, kick a 50, 2 x 100, kick a 50. 100yd hard, kick a 50.
TARPONS & TUNAS => down-ladder: 5x100, 4x100, 3x100, 2x100, with a 50 kick after each.
Warm-down => 100yd, easy, alternate freestyle and “stroke”.
Total Guppy yards this workout: 2000
Total weekly GUPPY yardage
If you do the first 3 workouts: 6500yd
These plus the 4th workout: 8900yd
All 5 workouts: 10,900yd
