While in the course of a F.I.S.T. Road Bike Fit Workshop last week, I fitted a subject to her road race bike. Using any typical road fit protocol, she'd have been fine. Mission accomplished. Done. But, we weren't done, as it turned out. When riding seated, hands-on-tops, she was too stretched out.
I describe that episode here to demonstrate two points:
First, there are 5 (at least) discrete, identifiable positions or postures one strikes when riding a road race bike, and all must be optimized before the fit is done.
Second, the very best way to accomplish this is with fit tools that allow you to test all 5 rider postures.
The 5 Road Riding Positions
Three of these road bike positions occur when seated: hands-on-hoods; hands-on-tops; hands-on-drops.
There are 2 out-of-the-saddle positions: hands-on-hoods; hands-on-drops. More on this is described elsewhere in this road bike fit series (did you realize we were in the middle of series on road bike fit?).
There is an alternate way to categorize these positions: ascending versus flat...
Ascending? Seated, hands-on-tops is a posture struck during a rhythm climb. Standing, hands-on-hoods is, of course, a typical posture while ascending, usually when the grade pitches up.
Flat? Seated, hands-on-hoods; seated, hands-on-drops; standing, hands-on-drops.
Yes, seated, hands-on-hoods is used both on flat and when climbing. But I find the posture is slightly different, depending on the pitch and depending on the effort used when riding. That's one reason why I write that there are at least 5 identifiable road positions. One could get pretty nuanced about this topic if one wished.
All of these 5 (or more, but at least these 5) positions must be optimized, if you want your road bike to work all the time, for all positions.
Handlebar Geometry
Back to the fit session described above. The default bars I tend to use most of the time are the workhorses made by FSA. These each have a (shortish) reach of 80mm, and they vary in drop: 125mm (shallow drop) versus 150mm (standard drop).
The subject I was fitting was fine with the 150mm-drop bar. She was dialed while in the neutral position, that is, seated with hands on the hoods. She complained only about the tops being too far in front of her. (But she did not complain until we simulated an ascent; more on that below.)
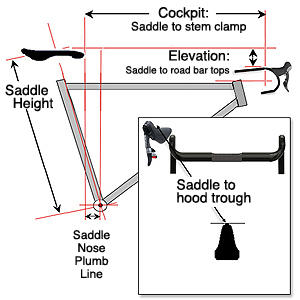
To assuage her discomfort I replaced the FSA bar with a Sampson ACO model, same drop, but 100mm reach, coupled with a shortening of the stem by 2cm. Presto, same drop, same saddle-to-hoods distance, same handlebar elevation, drops elevation, but, with one change: tops were brought in by 20mm—precisely what she wanted.
There are three major metrics that differentiate, geometrically, road bars from each other: width, reach and drop. A reasonably complete selection of bars, for a fit studio, would include 8 handlebars, all taped and with hoods attached. There's an image adjacent that details this.
Simulating Ascending During a Fit Session
The problem with my subject's cockpit distance (saddle to tops) was discovered during the trial of a position with an incliner (images attached) under the Exit Cycling fit bike I used during the fit.
The adjacent shop drawing about is of a little jig I whipped up in about an hour, as an adjunct to my Exit Fit Bike, which is one of the two styles of fit bikes I have in my fit studio (the other being the Coupe de Ville-ish Purely Custom fit bike).
My incliner is overkill. Really, if you just construct a frame built of 2"x4" under a rectangular sheet of 3/4" plywood, you're good. Maybe a strip around the perimeter, to make sure the fit bike's don't scott off the incliner. Slide it under the front feet of a fit bike and your subject is riding uphill.
Sit your 48" digital level atop the front and back supports. Here's a chart that converts percent grade to degrees. If your level reads 4.6 degrees that about a 8 percent grade, 5 degrees is about a 9 percent grade.
An incliner is not needed for tri bike fit. But it's impossible to simulate climbing positions used in road bike riding unless you simulate climbing. Now, to be sure, no fit bike is going to do this exactly, because, as opposed to, say, a Kurt Kinetic Rock and Roll trainer, there is no way I know of to get a fit bike to move the way a cyclist moves when he's out of the saddle.
But we can at least simulate the incline, which is helpful in a few ways. First, we can see if, when out of the saddle, the rider is balanced over the crank, with no need to bend overmuch at the waist. Second, we don't need to "rock and roll" when riding seated, hands-on-tops. Third, if we have a problem with saddle tilt or saddle shape (I hate it when I'm sliding off the back of the saddle when seated climbing, we might find it out in the fit studio.
The fit session referenced above was not finished until I placed my rider on the fit bike, underneath which was my incliner jig, and with her riding seated, hands on tops. That's when we discovered that hoods were good, but tops were not. Hence the change of bars. All 5 positions now optimized, the fit session was done.
Well, the session was done in terms of identifying fit coordinates. The session then moved to the next phase, which was identifying which bikes matched her fit coordinates. In point of fact, her current Scott Addict, size 52cm, was a great fit for her. As would have been a Specialized Venge, but not a Roubaix; a Felt AR Series, but not a Z Series, a Trek H1 geometry (Madone 6), but not its women's specific geometries (H3); and so on. More on matching coordinates to available bikes in another installment.
There are 8 road bar geometries that should serve to adequately outfit a proper fit studio.

This is the overbuilt incliner jig. Plywood sitting on a 2x4 frame would do just fine.

A fit bike that had a built-in incliner would be ideal. But we can make do with the shop-built version.

What should the incline be? This one take the bike to an 8 percent grade.

If I wanted to simulate a steeper grade, I could nest this incliner inside of a wooden frame underneath it.

This incliner is what I use to test seated, hands-on-tops and standing, hands-on-hoods.

If you build this overbuilt version, keep the underside hollow, so that your hole saw can pass through.

These workhorse FSA road bars are both short reach, and offer shallow and deep drops.

Most of the new bars these days advertise their specs.

This Sampson ACO is a nice example of a long reach bar with a standard drop.


